Showing posts with label candles. Show all posts

Tuesday, 25 March 2014

Pretty Candles for Mom


A new scented candle is always appreciated, but one that is made especially for Mom will light up the room with her happiness.


Turn ordinary candles into shining stars with family photos and embellishments. Print photos or digital designs onto tissue paper and cut out the images. Wrap the candles with the tissue paper and keep it in place with straight pins. A heat gun will melt the wax until it saturates and coats the tissue paper. A hidden brad embedded in the candle secures the flowers.
Surround any pillar candle with zigzags of wire. Choose colorful buttons that will match Mom's favorite room.


Small containers used as candleholders make striking mantel arrangements or centerpieces when grouped together -- perfect for Mother's Day.


(Better homes and gardens)

Wednesday, 11 December 2013

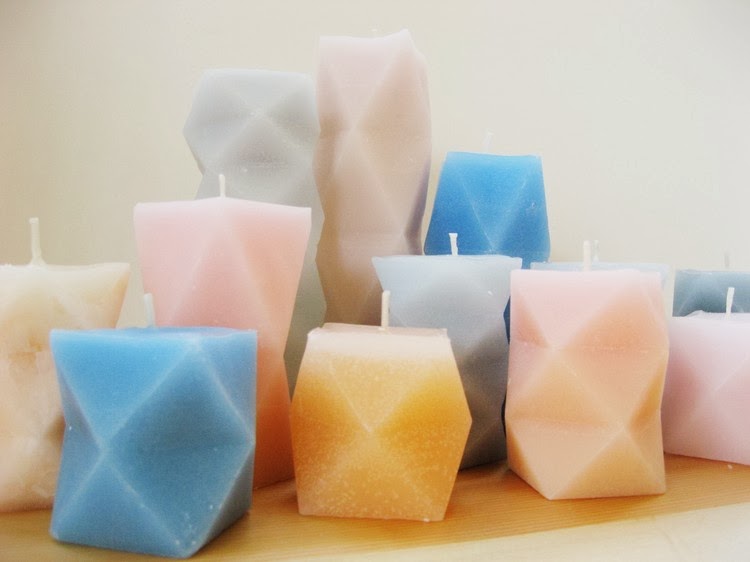
DIY: Geometric Candles

During the rainy/snowy parts of the year we love to burn a lot of candles. They’re a good way to add a little warmth to balance grey skies. These candles are surprisingly easy – the molds are made by cutting, folding and gluing paper or card stock. The project includes a free downloadable for all 7 different geometric candles shown.


Supplies:
- paraffin wax
- candle wicks (either tabbed as shown or wick + something like a pencil to tie it to)
- candle warmer or double boiler
- container for melting wax
- stirring stick
- scissors
- bone folder or other pointy but not sharp object (I’m using the back of the utility knife blade)
- straight edge
- basic white glue
- waxed paper or newspaper to protect your table
- candle dyes (optional)
- candle fragrance (optional, I used orange oil)
- printed copy of the download ~ howdidyoumakethis.com
- paper or card stock


You can use paper for your molds, but the wax can soak through the paper in some places. Card stock would make for better forms, especially for the larger candles.


Safety Warning: You’re managing hot candle wax, a hot surface, and paper molds. You’ll eventually burn your project. Make sure to use wax and wicks designed for candle making. Use caution around the hot wax by protecting your hands, eyes, surfaces, and anything else that could be injured or damaged. Never leave a burning candle unattended.


Lightly score all of the fold lines by using a bold folder, the dull side of a utility blade or some other pointed but not sharp implement. Cut out the mold pieces.


Crease the fold lines. Dotted lines are valley folds, solid lines are mountain folds.


Three tabs will glue to the bottom square.


Glue as shown. You’ll have your best results if you glue them one at a time and let the glue set between.


Glue the side tabs the same way.


Make sure the strip at the top is straight up. You don’t want to fill that part with wax, it’s there to make it easier to fill the rest of the mold.

When the mold is dry dab a bit of glue anywhere you see pinholes (between the flaps and at the corners of the bottom square are likely suspects.) This will help keep the wax inside the mold.


Set the tabbed wick in the bottom and secure it with a drop of melted wax. If you’re using wick strands tie the wick to a pencil and set it across the top of the mold so that the wick will set in the dead center of the candle.


Melt your wax in the cup on the candle warmer or in a double boiler. Mix in color and fragrance at the end of melting. Pour wax into the mold. Keep the wick centered and fill to the line at the bottom of the top strip. Let the wax cool.


As the wax cools the center will drop down.


Fill the depression back up with more wax. Again, let it set up completely.


When the wax is hardened peel off the mold paper. It will be much easier to do this if you place your candles in the refrigerator for a while before peeling.


Finally, carefully trim the sharp wax edge at the top edge with a straight blade and trim the wick down to about 1/4 of an inch.


Thursday, 31 October 2013

DIY Glittered Candles

Halloween is here, so grab this opportunity to learn how to make glittered candles with dates on them.


You will need:


  • pillar candles (of desired size and color) - these black ones are from Michaels
  • Vinyl & electronic cutter to make stencils 
  • Mod Podge and paint brush
  • Extra fine glitter

You can make a "31" for Halloween, but you could also spell out other words for any holiday or occasion! The possibilities are endless!  Cut out a 3 and 1 to make a vinyl stencil and applied to to the candle. Make sure the edges around the number or letter are sealed.


Next apply a thin layer of Mod Podge to the candle, making sure to cover the entire inner area of the stencil. You can work in small sections to keep it more controlled. Shake a generous amount of glitter over the glue, making sure to get every part covered. You can lightly press the glitter with your fingers to help it stick. 


Then shake, shake, shake and even lightly blow to remove excess glitter. Remove the stencil slowly and blow again to loosen excess glitter. You can fix the details with a Q-tip. 


Tuesday, 23 February 2010

Guest Blogger ~ Candle Cavern

Nature’s Natural Purifier
by David


Picking a subject for this blog I thought would be easy – just pick something interesting and talk about it. Then you worry that what may be interesting to you may be mind-numbing to others. So I decided to think of something that’s positive for us and those around us AND we can enjoy it.

As a candle maker, throughout my time I have used mainly soy wax as a candle medium. This is aimed at wanting to develop & promote interest in candles from natural products and from a sustainable source. It was this ethos that led me to work more and more with Beeswax which, I confess, I now thoroughly enjoy as much.

By nature, I am a curious type and decided to find out exactly what it is, where it actually comes from and the benefits of beeswax. I found a lot of fantastic information and research (from the good ‘ole internet mainly) opening an interest and enthusiasm to use, produce and provide candles from beeswax as well as promote the natural benefits that beeswax contains.

As most of us know, beeswax is the building material of the honey bee which they use to make honeycomb. But, the benefits of using it as a candle fuel generally is quite revealing.


Firstly, beeswax candles burn brighter, longer, and cleaner than any other candle! The flame emits essentially the same light spectrum as the sun and in the process of burning emits negative ions that are known to clean the air. These negative ions help rid the air of pollen, dust, mould, toxins and many other pollutants and it is this feature that makes beeswax candles ideal for allergy sufferers – something that affects and limits many people to a greater or lesser extent.

Air contains electrically charged particles or ions. Ions act upon our capacity to absorb and utilise oxygen, and therefore cause powerful effects on our lives and well being. The ions in the air can affect our mood, energy and health. Positive ions are loaded down with pollution and allergens that are drawn to them and suspended in the air. Negative ions, on the other hand, remove the pollution and allergens from positive ions, allowing them to drop harmlessly to the ground.

As it burns, the candle flame convects air, passing it through the flame. It burns off pollutants in the same manner as a catalytic converter in your car. Thus, beeswax candles are natural air purifiers.

I admit I am a convert and believer that beeswax candles can help practically as well as provide a pleasurable experience. It does cost more but sometimes you get what you pay for!


Lots to be found at my Misi store.