Showing posts with label heart. Show all posts

Monday, 3 February 2014

Valentine's Day: 11 Days ~ 5 Cute & Romantic Treats


Bake up some sweets for your sweet this Valentine's Day with these tasty love-themed cake and cupcake decorating ideas. Whether you're serving to a whole classroom or just that special someone, you'll find the perfect treat for the occasion.


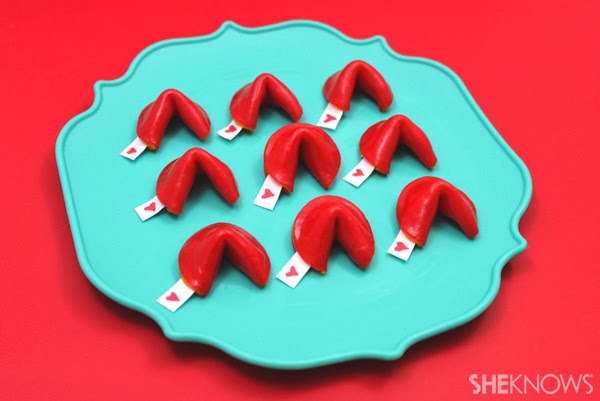
1. Fruit Roll-Ups Fortune Cookie


How about a Valentine's Day snack that's easy to make and even more fun to share? With special messages written and folded inside each one, everyone will feel fortunate to have you for a friend. Read more


2. Four-Cheese Ravioli


Homemade pasta is certainly an impressive entree that is not nearly as difficult as many people think.  Even filled and shaped pastas like this heart-shaped ravioli are easy and fun to make. Read more


3. Sweet Heart Cupcakes


Perfect little Valentine snack!. Use a cookie cutter to cut out a heart and fill with frosting (try for any theme!) Read more


4. Easy Valentine’s Day Cookies


Dip the top half of a wafer cookie on the melted chocolate and quickly sprinkle on your chosen sprinkles. Let it dry and Enjoy it :) Read more


5. Pecan Linzer Cookies with Cherry Filling


Crumbly, nutty cookies layered with sweet cherry jam and dusted with sugar make delectable valentines. Read more


And If you don't feel like cooking, visit our Handmade Food Category!


Friday, 31 January 2014

Valentine's Day: 14 Days ~ 5 Cute Wreath Ideas


If you miss Christmas decor you can start to decorate your home for Valentine’s day. The front door is a good place to start. Make a wreath to hang on it. There are plenty of cool ways to do that but we gathered only the most cool ones. By the way, some of these wreaths are also perfect to hang somewhere inside of your house. Enjoy!


1. Cockscomb Valentine Wreath


Nothing expresses the essence of Valentine's Day better than a big, full heart. Declare your love for a sweetheart -- or simply a love of romance -- with this handmade cockscomb wreath. Read more


2. Valentines Wreath and Frame


We love this original Valentine's Day wreath! And if you're a Beatles fan, it's extra special. Hard to believe it is very inexpensive! Read more


3. Valentine’s Pom Pom Wreath


This project is so easy that your kids can help me with the pom-poms. All you need is a form, some pom-poms and glue. Read more


4. Felt Heart Garland


This is an easy and inexpensive Valentines Day decoration sure to add a little love to you room. Read more


5. Valentine’s Day Flowers Wreath


If you love the sight and smell of fresh flowers around you and you’re looking for some unique ways to brighten up your home then this cute wreath is the best for you. Read more


Happy Valentine's Day!


Monday, 27 January 2014

Valentine's Day: 18 Days ~ 5 DIY Treats with Hearts


Valentine’s Day is just around the corner, and who doesn’t love giving and receiving handmade treats with hearts to celebrate the special day?  Whether you have oodles of free time on your hands or non at all, there are Valentine’s treats  that will fit into your schedule and your stomach!


1. Chocolate Valentine's Suckers


Load the sucker molds with sucker sticks. Squeeze the chocolate over the tip of the stick first and into the whole of the mold and chill in the refrigerator for 10 minutes or so. The heart lollipops are ready! Read more


2. Flying Heart Cupcakes


Bake your heart cupcakes with a marble between the liner and pan to create this shape. Beautiful idea, isn't it? Read more


3. Conversation Heart Cookies


Once iced, these cookies need to dry completely overnight before being stamped with a message for your sweetheart. Read more


4. You Make My Heart Sing Cake


Make your loved ones’ hearts beat quicker and grow fonder when they taste these delicious creations made with love and care by YOU. Read more


5. Sweetheart Pops


Sweet creations that kiddos will certainly need help with, these sweetheart pops are fun and tasty treats. Read more


And if you don't feel crafty, check out our Food & Sweets Category!

Thursday, 16 January 2014

Valentine's Day: 29 Days ~ 5 Ways to Countdown to Valentine's Day!


Think countdown and advent calendars are just for Christmas? Think again! Countdown to Valentine's Day this year with this fun, cute and easy DIY craft you can do with your kids!


1.  Hearts & Tags


The great thing about this craft is that you can customize it completely.. Spend the day making this cute calendar with your kids and create a fun way to count down to February 14th! Read more


2. Celebrate Love


The magnetic Valentine’s tins include a message to the kids each day that tell them one of the reasons they are special and why they are loved. Read more


3. Sweet Ideas


Fill out 14 cards with sweet ideas, and put one card inside each envelope. Open one envelope daily, and complete the task on the card together. Read more


4. Paper heart chain


Count down the days until Valentine's Day in style with a handmade paper heart chain. Read more


5. Cute DIY Calendar


Are you ready for some Valentine cuteness?! Write a message in the little cute envelope, fold it and add a number on it. Read more

Happy Crafting!


Tuesday, 14 January 2014

Valentine's Day: 31 Days ~ 5 Gift Wrapping Ideas


Add a personal touch to your delivered Valentine gifts with our simple Valentine's Day gift wrapping ideas.

See how to create personalized wrapping using inexpensive craft supplies and items you probably already have in your home.


1. Fabric Gift Pouch


Here is a little fabric gift pouch - it is the perfect size to gift some jewellery or other small item. They are really quick to make. Read more


2. Paper Doily Envelope


Check ouy this simple tutorial on making an envelope for your valentine card made from a paper doily. Super easy: fold, fold, fold, seal with a shiny heart sticker. That’s it! Read more


3. Heart Cut-out Gift Wrapping


Wrap your whole present in red paper or tissue paper, then take your brown paper and using a craft knife, cut out half a heart and then bend that half backwards to reveal the red paper underneath. So simple yet so effective! Source


4. Eraser Heart Stamps


Draw a heart with your pen on the eraser of your pencil, thenake simple incisions with your x-acto to chisel the heart. Cut it down about half way down the eraser and stamp away! Source


5. Small candy box


these homemade Valentine gifts that don’t aquire some unusual skills or expensive supplies but would have big impact. The point is to make an impression and to warm the heart of your closest friends. Read more

Friday, 13 December 2013

Christmas Countdown: 11 Days ~ DIY Clay House Ornament Gifts


If you're looking for some fun and easy ways to spruce up your front door and yard for the holidays, look no further! Check out this DIY project that will have your home looking festive in no time or you can give it as a gift to your beloved ones.

This project is pretty simple to create. You could easily make an entire neighborhood of houses without too much effort.

Tip: I recommend storing your extra clay in an air-tight container while you work so that it doesn’t dry out and you can use it again for other projects


Supplies needed:
  • House + Flag Template – Download
  • Premier Stone Clay | You can also use oven-bake clay for this project if you’d prefer (although I don’t cover the baking step in this tutorial)
  • Craft knife
  • Craft scissors
  • Twine | I recommend something that is sturdy but not overly thick
  • Freezer paper or waxed paper to protect your work area
  • Rolling pin (I use a non-stick version. I’m not sure how a standard one will work)
  • Glue 
  • Bamboo skewer

Optional items for customization:
  • Fine glitter
  • Paintbrush
  • Tiny star-shaped cookie cutter 


Cut out the house template you’d like to use (there are two size options available on the printable file), then begin by protecting your work surface with a piece of freezer paper (waxed side up) or waxed paper. Take a golf ball sized portion of clay (or larger if needed) and begin rolling it out using your rolling pin. Make sure that the flattened shape is is both wide and long enough to fit the house template you will be using. The finished thickness of your rolled clay should be about 1/4.”


Place your template on top of your prepared clay and use the tip of your craft knife to lightly trace around the outer edges of your template. The goal is not to cut all the way through the clay, but to give yourself a guide for the next step. Once you’ve traced your house shape with your blade, begin cutting out your house. This is best accomplished by cutting straight lines all the way along each flat edge until your blade passes through the edge of your clay. This will remove clay in smaller sections and will give you the cleanest edges on your house. Tip: If you are worried about cutting into your work surface, I recommend working on top of a cutting board or self-healing mat.


Use your finger to smooth out any roughness on the edges or surface of your house. It can sometimes help to add a dab of water to your fingertip during the smoothing step. Once your shape is nice and smooth, use the sharp end of a skewer to press a hole into the center of the top point of of your house. The impression doesn’t need to be too deep. This is where you will be gluing your twine for hanging.


While the clay is wet you may wish to add additional decorative touches to your house. In the first example I used my craft knife to very gently create the outline of a door and window. In the second, I used a small star cookie cutter to punch a design out of the center. If you would like to glitter your ornament, you will need to wait until the design is dry to do so (keep reading below).


You can see the full tutorial here: creaturecomfortsblog.com


Happy Holidays!


Monday, 30 January 2012

With Love from MISI for Valentines...