Monday, 24 February 2014

How to Get a Verified Account on Twitter

Wouldn't it be cool if you had that white check mark in a blue cloud on your Twitter profile? If you get one, it means you hold a "verified account." Twitter uses verification to establish the authenticity of tweeters, and does so proactively—they concentrate on "highly sought users in music, acting, fashion, government, politics, religion, journalism, media, advertising, business, and other key interest areas." If you (or your boss/client) fit the bill, here is how to go about getting your Twitter account verified.


  1. Get a Verified Account on Twitter Step 1.jpg
    1
    Determine if you qualify for a verified Twitter account. Twitter verifies as few accounts as possible and only for legitimate reasons. Reasons for asking Twitter include being a highly recognizable public figure (athletes, artists, public officials, public or government agencies, etc.), or if your name and likeness is parodied or impersonated on multiple Twitter accounts, leading to identity confusion.[1]
    • Though Twitter does not have an official stance on this, several Twitter-verified companies have indicated that spending $5000/month on Twitter advertising will also get (and keep) your account verified.[2][3]
    • Twitter will not consider you for verification based on your number of followers. Twitter urges Tweeters to "Please note that follower count is not a factor in determining whether an account meets our criteria for verification."
    • Twitter recommends embedding a Twitter "Follow" button on your official website as the best alternative to verification. You can learn how to do this here. This allows you to obtain followers directly from your official site, which is very helpful if there are multiple Twitter accounts that use your name.
    • Twitter also recommends including a link to an official website as an alternative to verification.

  2. Get a Verified Account on Twitter Step 2.jpg
    2
    Read the Verified Account terms. These terms explain what a verified account is, what it means to be verified, who has the verified badge, identifying a verified account, etc. They can be found here.
  3. Get a Verified Account on Twitter Step 3.jpg
    3
    Find out how to apply for a verified account. Send a direct message to this address. Be sure to have the following information ready.
    • Account name
    • Full name
    • Location
    • Official website (you will be given a suggestion to put the Twitter logo or badge on your official website to speed up verification)
    • Bio information (information about yourself in fewer than 160 characters)
    • Primary contact name (referring to the individual who manages the account)
    • Additional Contact Information
  4. Get a Verified Account on Twitter Step 4.jpg
    4
    Wait for Twitter to respond. If you don't get a reply shortly, you can contact Twitterby snail mail or through Twitter. Keep in mind that Twitter deals with a high volume of verification requests, and that it focuses first on the most "highly sought users."[1]
  5. Get a Verified Account on Twitter Step 5.jpg
    5
    Follow Twitter's instructions for verifying your account. If Twitter decides that you qualify for a verified account, they will reach out to you via direct message. Click the link in the direct message to be taken to finish the process.
    • The final part of the process has 3 parts, Learn how to Tweet effectively, Connect with other Interesting Twitter Users, and Protect your Account.
      • Learn how to Tweet effectively gives you a choice between 2 tweets and asks you to choose which one is better. It has the form of a quiz, but there will be no negative effects if you do not answer correctly.
      • Connect with other Interesting Twitter Users gives you the option to follow other verified accounts. Twitter believes that this gives you more legitimacy as a verified user.[6]
      • Protect your Account asks you to enter a phone number that Twitter can call if there are any problems with your account. Once you have completed this step, your account will be verified.
  6. Get a Verified Account on Twitter Step 6.jpg
    6
    Do not change your account information. Once you have received a verification badge, it is important to keep your account information the same. Changing information, such as your profile image, can cause Twitter to remove the badge, forcing you to contact them again.

Friday, 21 February 2014

What Marketing Really Is ( and How It Can Help Your MISI Shop)


Hello MISIANS! It sounds like the biggest thing keeping you from sharing your own handmade goodness with the world is the you are terrified by “marketing.”

So let’s clear this right up!


Marketing = all communication with the people who will (and do) love your work.


This means 3 things:

  1. Marketing can be as simple as talking to people who love what you make.
  2. Everything that communicates is marketing; including your labels, your photographs, every word on your website, some of your tweets, and of course, your product descriptions.
  3. Your job with your marketing is not to convince people to like you or what you do. It is not to convert a non-believer. It is not to put your work in front of people who won’t buy it (either because they can’t afford it or don’t like it.)

Isn’t that better?


So what are we talking about when we talk about marketing?

Getting really clear in your message. Your message includes who you are, what is special about what you make, and how it benefits the buyer.

Sharing that message so that the people who will love your work know it exists.

Identifying who those people are and where they hang out, so you can speak to them.


Now, instead of despairing at what you haven’t done yet, can you celebrate the bits of this list that you are already doing? (Hint: if you have a website – you’re already sharing your message! If you’ve made even one sale, then you’ve identified at least something about your people.)


What is the marketing (ie, communicating) you’re already doing with the people who will love your work?


Thursday, 20 February 2014

Trust ~ How to Increase your MISI Sales


Trust is a huge piece of the buying process. I’d wager that trust matters the most, not only when a customer buys something, but also when he recommends that product to another person.

Before you buy a product or service, you need to trust that you’re going to get what you pay for. Trust can mean the difference between zero sales and LOTS of sales, no matter what product or service you’re trying to sell.

You could sell the most amazing product in the world, but if your customer service sucks and you ship it two weeks later than the customer expects it, he’s going to be disappointed. Your customer won’t pass along the information for the amazing product that he got. Instead, he’ll probably warn people about the negatives.

The best and most effective way to sell without selling is to get referrals from people who fall in love with your product.
If a customer trusts you and your company, she won’t hesitate to tell her friends and family members about your services.
But, if she doesn’t trust you due to bad experiences she’s had with your company, she won’t. You want people to boost about your products in such a positive way that others have to check them out.

Once you’ve developed trust, you won’t have to worry about selling your product, because other people will do it for you. Pretty cool stuff. You’ll be able to focus on creating new products and improving the ones you have instead of spending lots of precious time on selling.

This probably sounds great, but you might be wondering how to put this plan into action. Follow these 5 steps to build trust with your customers:


1. Be honest about what your customers will get. 

Some small businesses make the mistake of promising their customers things they can’t deliver. If you want repeat customers, you can’t do this!

Action: Look through all of your product or service descriptions, and ensure that you can back up every statement that you make.

2. Exceed your customers’ expectations. 

To get repeat customers, always try to go beyond what your customers expect. For example, you might have a policy that says you always ship within four business days. Exceed expectations by doing your best to ship within two business days. You’re giving yourself a cushion just in case something comes up, but you’re also trying to go beyond what your customer expects.

Action: Figure out at least two ways that you can exceed your customers’ expectations and put them into place today.

3. Offer a 100% money back guarantee.

A lot of creative businesses already do this, so it’s something a lot of customers expect. I often see small businesses who won’t offer this, because they don’t believe in their products. If you’re confident in your product, this shouldn’t be a problem.

Action: Add a 100% money back guarantee to your policy today. This gives prospective customers a safety net, and they’ll be more likely to buy from you.

4. Admit when you make mistakes and do everything you can to fix them. 

If a customer contacts you to let you know that her bracelet arrived broken, apologize, tell her you’ll send a replacement to her that same day if possible, and ask her if there’s anything else you can do. Send a little something extra with her new bracelet. Most of the time, your helpful customer service will override the issue with the product. She’ll let her friends know how fast you responded to her and what a great experience she had with your company.

Action: Respond swiftly to issues and fix them.

5. Try to get feedback from your customers 

in order to improve your products and services. Contact each customer through email after they’ve received the product. Do not send out an automated message. Type something personal, and ask each customer for feedback. Keep the email short and to the point.

Wednesday, 19 February 2014

DIY ~ Rustic Lampshade made of Yarn


This lampshade is easy to make and looks rustic and unique! You only need a few things to create your own lampshade.

Requirements:

  • An old lampshade
  • Yarn of any type or thickness
  • 2-3 bottles of school glue or tacky glue
  • 2 cups of water
  • Plastic wrap
  • Wire cutters, Needle-nose pliers and wire (optional, as needed in order to attach the lamp shade to the base)
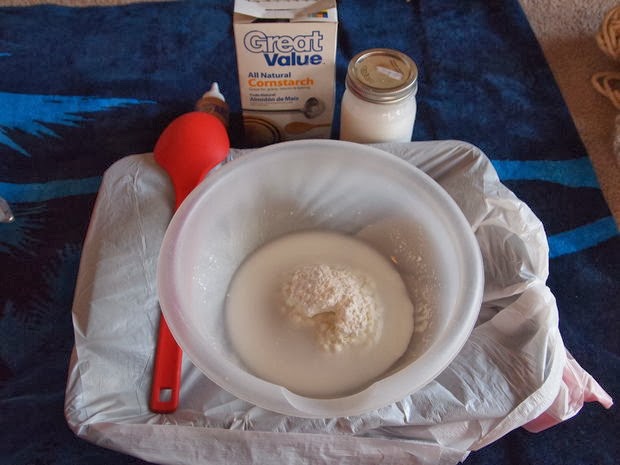
  • 1/2 cup of cornstarch (this is optional, so don't worry if you don't have it on hand)
  • Large bowl & whisk or spoon
  • disposable gloves (optional, but highly recommended)
Instructions:
First, lay out a towel on the ground or at your work area (or newspapers). Take out the plastic wrap and cut off a piece to wrap around the lampshade. Once fully around it, you may want to go to the inside of it to add a few pieces of tape here and there to secure it to the lampshade. Once the plastic wrap is securely on the lampshade, we're ready to start making this!

Take out the bowl and pour the glue in and mix it up. After mixing it, add the 2 cups of water and continue to mix. If you have corn starch, now you'll want to add that in last and use a whisk to mix it up so there aren't any clumps.

Then, cut out pieces of yarn about 6 feet long each (it doesn't matter if you cut them out longer or a bit shorter) - you can decide that as you go along. If too long, the pieces tend to form knots. You don't want them too short either. So, put a few of those yarn pieces into your bowl and dunk them in the glue mixture. Pick a piece up, and as you do, use your other hand to go over the piece to remove all excess or dripping glue from it before you wrap it around the lampshade. You can wrap it around as you please and as much as you like. Try to avoid any large gaping holes. If you do have gaping holes in it, after it is fully dry you will need to make sure the lamp is structured enough and may need to tie little pieces together to get rid of those gaping holes. So, avoid that by not leaving any massive spaces. Once you are happy with how it looks and how many pieces you've wrapped it with, you will then need to let it dry!

I hung mine up with a long piece of yarn and allowed it to dry in my house - it took 24 full hours for it to be 100% dry and solid. Once it is dry, you'll need to carefully loosen it up bit by bit to get it to slide off of your lampshade. I did this one area at a time, starting at the top of the lampshade - and it worked very well.

Once you have it off, you'll need to determine how to reattach it to the base of your lamp. This really depends on the lamp you have and the style of the base. With mine, you can see in the photos how I used pieces of wire to reattach it. I tried to keep it to a minimum and not make it too noticeable and I like how it turned out. Needlenose pliers work really well for bending the wires easily.

Source: instructables


Tuesday, 18 February 2014

DIY Carnival costumes!

Carnival is a festival much loved by children. The confetti, the trumpets, many are the things that are pleasing to children during this festival. But the thing that they love the most, are the clothes of their favorite heroes or idols. Yes, but those are expensive! Buy a Carnival’s costume is expensive, and often, in times of crisis, the best choice to please everyone and save money, is to create a costume with your own hands. You just need a little bit of talent, you can also involve your children if you want but you do not need to be a skilled seamstress!

For example, if you want to make a bee costume, you need a pair of black tights and a black turtleneck. You can create yellow strips with paper or cloth and glue them on the dress. For the wings you just need to cut them on a white paper and then glue them to the turtleneck, while for the antennas, take a dark hairband and put two iron wires where you will insert two yellow balls at the ends. And voila!


If your child wants to dress up as a flower, you need a pair of green tights and a green turtleneck, while for the mask you need a piece of yellow paper that you will cut to create a circle. Cut the paper to create the eyes, nose and mouth and then take the colored crepe paper and create the petals that you are going to set on the paper with a stapler. Finally, drilled both the ends of the paper and let pass a strap inside so you can wear the mask. That’s all!


As you can see it is easy to create costumes that you can easily bend in your suitcase if you go on holiday with children for a weekend during Carnival.

(riccionefamily)

Monday, 17 February 2014

DIY ~ Homemade Grapefruit Bath Salts

diy ~ grapefruit bath salts

Making sweet smelling salts that will give your nose (and whole body) a hug in the the warm bath is super simple to, it doesn't take more than 2-3 mins and you are done!
Keep reading to see the full tutorial on making these sweet smelling bath salts yourself!
Add a couple drops of pink food coloring to ice cream salt or sea salt (about 1 cup). Then add about 4 drops of an essential oil. Whatever your favorite scent it.
Mix and shake in a bag!
Pour the content in a jar of your liking and made a pretty label with some mini stamps and fabric. Would make a great gift too!
What fragrance would you add to your bath salts? 

How to Keep Your Followers on Twitter

Once you've accrued many followers on Twitter, you'd like to retain them. The best way to do that is to engage your audience with interesting, thought-provoking posts, without posting so frequently or repetitively that you annoy your subscribers. Here are additional concrete tips to help you achieve that.

  1. Keep Your Followers on Twitter Step 1.jpg
    1
    Provide content that your followers are interested based on how you define yourself on your profile. Most people use Twitter as a personal outlet to talk about interesting events and thoughts in their lives, but if you are a professional or if you have specific hobby, you should include that information in your Twitter bio. Subscribers will then know of your passion and that you will sometimes post about it. They can be interested in these things as well. Also, if you post in your summary for About You that you will follow someone back, be sure to do so and this could get you more followers by the minute.
  2. Keep Your Followers on Twitter Step 2.jpg
    2
    Interact with your followers by replying to their questions and asking them questions. Keep your follow list small enough that you can interact with a large percentage of them. Offer to help your followers who need help that you can provide.
  3. Keep Your Followers on Twitter Step 3.jpg
    3
    You may want to avoid taking a strong stance on controversial issues (e.g., sex, politics, religion) to avoid enraging any followers. However, remember that Twitter is your personal outlet and that you are free to express your thoughts. If someone vehemently opposes your positions and is so unnerved that they can't remain subscribed to you, it's probably for the best. Strike a balance between staying true to what you believe in and not inflaming your audience.
    • That said, don't post tweets that are senseless and offensive. For example, being racist or insulting people are unnecessary behaviors that could land you in a lot of trouble.
    • Avoid using slurs and inflammatory types of language that can be offensive.
  4. Keep Your Followers on Twitter Step 4.jpg
    4
    Don't have long conversations over Twitter with specific individuals.Remember that every time you reply to someone, your tweet is sent to your subscribers and visible to them. If you have many conversations, your subscribers' feeds will be littered with your tweets that have nothing to do with them. If you need to communicate with an individual, privately direct message them instead.
    • Do not engage trolls who @ reply to you in order to get a rise out of you. It's not worth your time or effort.
  5. Keep Your Followers on Twitter Step 5.jpg
    5
    Avoid sending auto DMs because people assume they are spam and find them annoying. They also may think that your account has been hacked or is a robot and consequently, unfollow you.
  6. Keep Your Followers on Twitter Step 6.jpg
    6
    Do not radically change the content on Twitter after you've already established a Twitter presence. People like consistency and followed you for a reason. If you started your Twitter as a personal outlet but later switched to only providing advice on public speaking, be prepared to lose subscribers who aren't interested in your new topic.

Friday, 14 February 2014

Happy Valentine's Day ~ Origin, History and Traditions in UK


What is Valentine's Day?

Valentine was a Roman priest put to death on February 14th, AD273 for refusing to give up his Christian faith. The day coincided with the Roman Spring festival, Lupercalia, held in honor of the gods Pan and Juno. Lupercalia was believed to be one of the most important festivals in the Roman calendar, and was brought to Britain by the Romans. The early Christian church frowned upon the festival but unable to prevent people from celebrating it, linked it with the name of St. Valentine, who became the Patron Saint of Lovers. 


Folk Tales and Customs

There are many folk tales and customs surrounding the celebration of Valentine’s Day in the UK. Today it is a more commercial venture than was seen in Britain in the Middle Ages when February 14th was believed to be the day birds paired up ready for the mating season. 

One of the first records of Valentine’s Day linked with romance was a poem by Chaucer in 1382. The poem celebrated the anniversary of – the 14-year old - the King Richard II to Anne of Bohemia. And, the first Valentine was believed to be a poem written by Charles, Duke of Orleans to his wife whilst being held in the Tower of London. 

In Wales carved wooden lovespoons were given as gifts on February 14th. Hearts, keys and padlocks were favorite decorations on the spoons, symbolizing an 'unlocking' of the heart. 

Valentine's Day Card

Valentine Cards

The earliest known Valentine card was sent in 1477 in the form of a letter between Margery Brew to John Paston in Norfolk with the printed Valentine appearing in the late 18th century. The popularity of the sending and receiving cards grew alongside the improvement in postal services and methods of printing to the point in the 1830’s where postmen needed refreshments to help them with the unprecedented number of cards they had to deliver.


In British folklore there are many ‘spells’ to be cast, rhymes to be sung and rituals to perform to supposedly find your one true love. Two popular ones are bay leaves on the pillow before sleep and repeating 'Dear Guardian Angel, let me have what I so earnestly do crave, a Valentine imbued with love, who will both true and constant prove.' before sleeping and your one true love will appear in your dreams. Or, to attract love in to your life, scratch 'All my love come to me' into a white candle using a thorn from a white rose bush. Watch the candle burn down and picture your love coming to you. 

Vintage Roses

Flowers

The sending of flowers on Valentine's Day is reputed to be the busiest day of the year for florists. But there is a language associated with which flowers to send. 
  • Red roses declare true love, but a white rose means I Love You Not! 
  • Yellow depicts jealousy with pink for innocent love. 
  • Red Tulips are a declaration of powerful love 
  • and Snowdrops bring hope. 
So check first to see what the flowers you are sending carry the correct message. 

Dark Chocolate Heart

Food on Valentine's Day

If florists find Valentine's Day their busiest of the year, restaurants to benefit from all those romantic dinners for two. A more open declaration is to cook for your loved one. There's no need to make it a stressful event with these tips and hints on creating a romantic dinner. And, if you are stuck for ideas here are some menu ideas.


source: about.com