
Warm weather is here & that means taking food to the park, beach, in the car and everywhere else on the go. Why not transport it in a fun, reusable bag? My Super Simple Reusable Sandwich Bags are a quick project made extra practical by using laminated cotton for the interior that makes them easy to wipe clean or just toss in the wash. Perfect for sandwiches, cookies and other small snacks. And so much cuter than a plastic baggie!


You'll Need:
- 1/2 yard cotton fabric
- 1/2 yard laminated cotton
- 1 package of double fold bias tape
- Coordinating thread
- Plastic snaps & snap pliers/press
- Sewing notions: ruler, shears/rotary cutter, pins
Step 1:
From the cotton and laminate cut rectangular pieces that are about 15.5 inches high by 7 inches wide (this would work for most "regular" bread sizes). Using a small dish or bowl, round off one end in a concave shape and the other end in a convex shape, so they look like this:

Step 2:
Place fabrics together with wrong sides facing. Encase the concave edge in bias tape and stitch together close to the folded edge of the tape. Don't worry about folding under the edges - this will get hidden when the rest of the tape is attached.

Step 3:
Fold bag up 6 inches, as shown, so that the laminated side is facing inward and pin together.

Step 4:
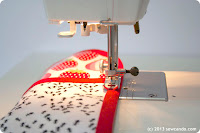
Starting at the lower left corner, fold the raw edge of the bias tape under and encase all the fabric layers in the tape, stitching close to the folded edge of the tape. Continue all the way around the bag to the opposite corner, folding that corner under as well:

Step 5:
Now we have some perfect pouches that just need a quick closure added:

Step 6:
For the closure I prefer to use a plastic snap. Why? Well, for one thing, they are super sturdy and very quick to install (I use my snap press and it takes just seconds). Secondly, they are easy to keep clean with a quick rinse, unlike velcro & zippers that can collect crumbs. And there's no risk of them wearing out or rusting with a lot of washing, which items like this tend to get with regular use.

Step 6a:
Attach snap so the male half is on the center of the inner flap, about an inch from the edge. Attach other half of snap on the front of the bag, this time with the female half on the outside.

Now the sandwich bag is all set, so you can enjoy taking tasty treats wherever you go!

source: sewcando.com


0 comments:
Post a Comment