
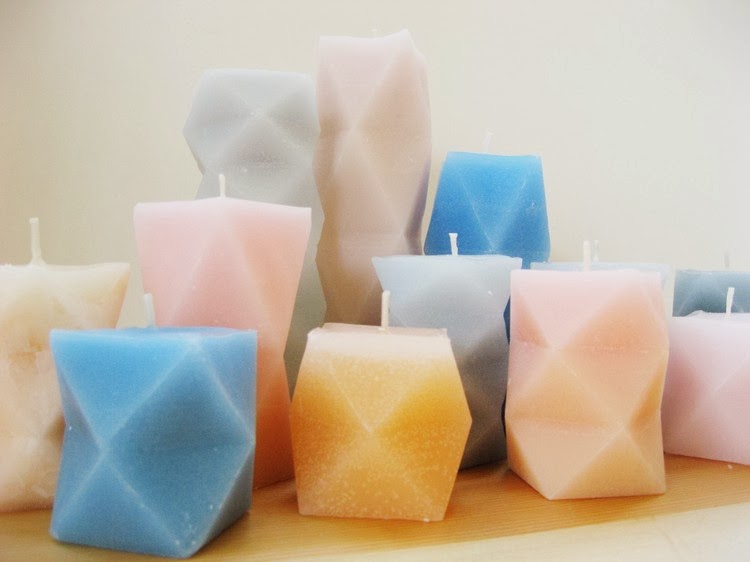
During the rainy/snowy parts of the year we love to burn a lot of candles. They’re a good way to add a little warmth to balance grey skies. These candles are surprisingly easy – the molds are made by cutting, folding and gluing paper or card stock. The project includes a free downloadable for all 7 different geometric candles shown.
.jpg)

Supplies:
- paraffin wax
- candle wicks (either tabbed as shown or wick + something like a pencil to tie it to)
- candle warmer or double boiler
- container for melting wax
- stirring stick
- scissors
- bone folder or other pointy but not sharp object (I’m using the back of the utility knife blade)
- straight edge
- basic white glue
- waxed paper or newspaper to protect your table
- candle dyes (optional)
- candle fragrance (optional, I used orange oil)
- printed copy of the download ~ howdidyoumakethis.com
- paper or card stock
Download the Printable Templates PDF by clicking here! ~ by howdidyoumakethis.com
You can use paper for your molds, but the wax can soak through the paper in some places. Card stock would make for better forms, especially for the larger candles.
Safety Warning: You’re managing hot candle wax, a hot surface, and paper molds. You’ll eventually burn your project. Make sure to use wax and wicks designed for candle making. Use caution around the hot wax by protecting your hands, eyes, surfaces, and anything else that could be injured or damaged. Never leave a burning candle unattended.

Lightly score all of the fold lines by using a bold folder, the dull side of a utility blade or some other pointed but not sharp implement. Cut out the mold pieces.

Crease the fold lines. Dotted lines are valley folds, solid lines are mountain folds.

Three tabs will glue to the bottom square.

Glue as shown. You’ll have your best results if you glue them one at a time and let the glue set between.

Glue the side tabs the same way.

Make sure the strip at the top is straight up. You don’t want to fill that part with wax, it’s there to make it easier to fill the rest of the mold.
When the mold is dry dab a bit of glue anywhere you see pinholes (between the flaps and at the corners of the bottom square are likely suspects.) This will help keep the wax inside the mold.

Set the tabbed wick in the bottom and secure it with a drop of melted wax. If you’re using wick strands tie the wick to a pencil and set it across the top of the mold so that the wick will set in the dead center of the candle.

Melt your wax in the cup on the candle warmer or in a double boiler. Mix in color and fragrance at the end of melting. Pour wax into the mold. Keep the wick centered and fill to the line at the bottom of the top strip. Let the wax cool.

As the wax cools the center will drop down.

Fill the depression back up with more wax. Again, let it set up completely.

When the wax is hardened peel off the mold paper. It will be much easier to do this if you place your candles in the refrigerator for a while before peeling.


Finally, carefully trim the sharp wax edge at the top edge with a straight blade and trim the wick down to about 1/4 of an inch.


Cute
ReplyDelete